Getting Started
This guide will help you get up and running with the project and basic functionalities of the Franka Arm. It assumes the server is already installed on the mini PC. If it's not the case follow the server installation instructions.
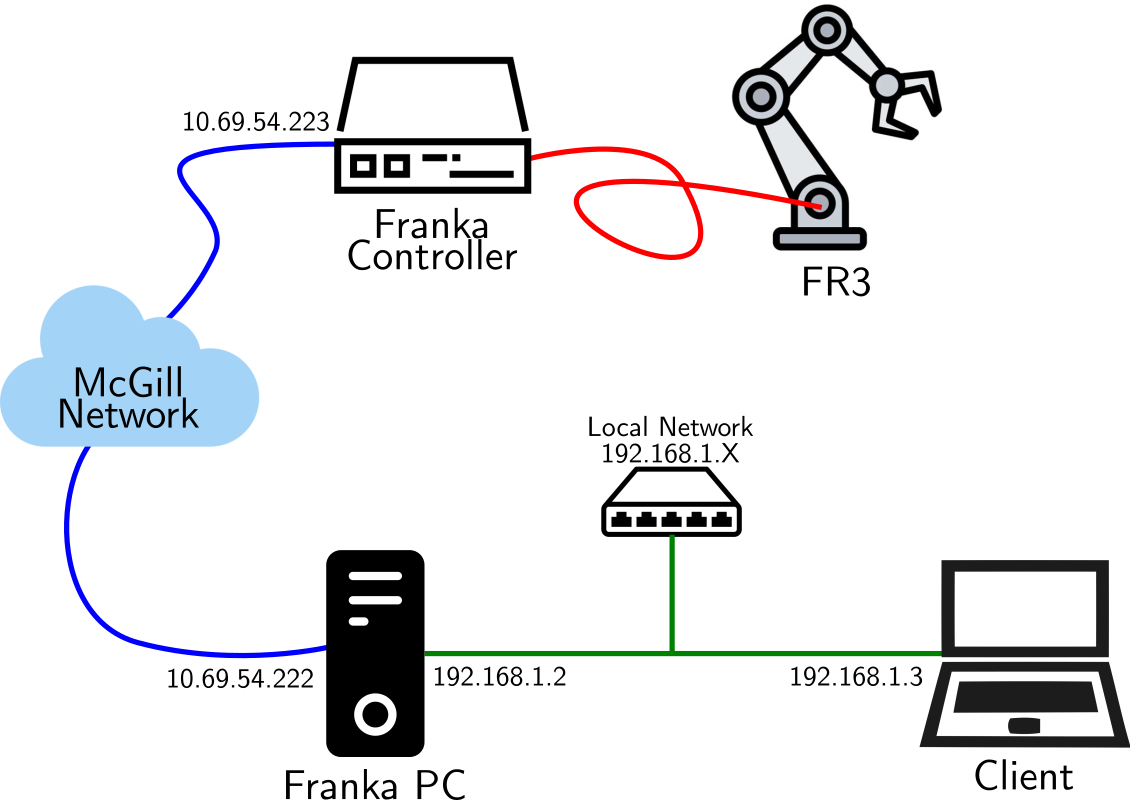
Glossary
- Franka Control / Controller: Black Box on the table
- Franka PC / Desktop: Franka PC on the ground
- Franka Desk: Web app to control the robot
- FR3-server: Set of ros2 nodes to publish the robot states and send position commands. Running on the Franka PC.
General Info
Model: Franka Research 3
IPs
- Controller IP: 10.69.54.223
- Franka Desktop: 10.69.54.222
ROS2
- ROS2 Version: humble
- Domain: 01
Useful Resources
1. Connect to the Franka PC (server)
-
Connect your host to the switch via the Ethernet cable
-
Set your network configuration
-
IP: 192.168.1.3, Net Mask: 255.255.255.0
-
Test the connection
Network Setup
-
-
Configure the ssh connection to the Franka PC
-
Test that ssh works
-
Add ssh to your configs
-
In
~/.ssh/configadd the following configurationHost franka-pc HostName 192.168.1.2 User csirois IdentityFile ~/.ssh/id_ed25519 # (1)! ProxyJump cim-jump ForwardX11 yes ForwardX11Trusted yes LocalForward 8443 10.69.54.223:443 # (2)!- To log without the password. See comment below.
- To forward desk to local port
-
You can now connect to the Franka PC with:
-
SSH without the password
TODO...
-
2. Start the Robot
-
Power on the Franka Controller
-
Open Franka Desk
-
You have two options: on the Franka PC or via SSH (recommended)
-
On the Franka PC
- Open a session using the monitor connected to the PC
- User: csirois, pwd: FrankaPC2024
- In a browser, go to 10.69.54.223
- Open a session using the monitor connected to the PC
-
Using SSH on your laptop
- SSH to the Franka PC
- In your browser, open desk https://localhost:8443/desk/
-
-
Unlock the joints
-
Activate FCI
3. Test the robot
See Franka Server User Guide for a comprehensive guides on the Franka Server functionalities.
- TODO: Add test script
Save the motors
Make sure to lock the joints when you don't plan to use the robot for a few minutes. It prevents the motors from overheating.
4. Setup the client
The ADL ROS2 packages provide various way for controlling the FR3. The easiest is to use the arm_client, a python wrapper
around the ROS2 server.
Follow the steps to install the project:
-
On your host, clone the project
-
Install the environment
- See the note below for pixi installation
-
Build the ROS2 packages
- To start a shell in the pixi environment
ROS2 Workspace
This build the ros2 packages to
install_humbleandbuild_humble -
Verify the installation
Pixi
Pixi is a fast package management tool. To install, follow the installation instructions.
5. Control the robot!
-
Start the server
-
Run an example
If you wish to to run scripts from Visual Studio Code, look at VS Code Setup Instructions.
Explore the other examples
to discover various ways of controlling the robots.
Next Steps
- Explore the API Reference for detailed documentation
- Review the Developer Guide if you want to contribute